


As a display coordinator for Anthropologie, I designed, built, and installed window and store displays. The skills needed for the job included everything from carpentry to sewing to painting and anything in between. Handyman work, building fixtures, and signage also fell under my purview.
This highlight album includes my favorite projects from each season.
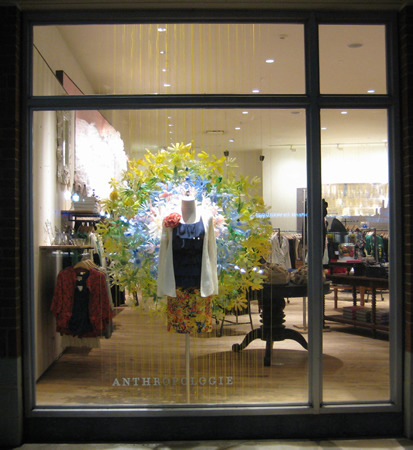
Bali Windows
Huge tropical leaves were the inspiration for this set of spring windows. Creating the leaves was very labor intensive—I created enormous wire frames that I covered in wet tissue paper then shellacked to seal in shape. The stems were made from conduit pipe bent into shape and covered in tissue paper.
A view of the leaves from inside the store.
High Chest, Cute Knobs
To display some of Anthropologie's knobs and pulls I drew a fancy high chest and screwed the knobs into the wall as drawer handles.
Bottle Flowers
This was one of my favorite windows I ever did for Anthropologie. I transformed an everyday material into something beautiful...see the next picture for the details.
My intern and I made almost 2000 of these flowers—out of plastic bottles! We collected bottles from employees and a local gym and cut the tops and bottoms into petals. I then spray painted the back of the flowers to give them color but still keep that shiny lustre.
To suspend the flowers, I strung mason line from floor to ceiling in a series of rows (it took a lot of mathematical calculation and fancy ladder maneuvers to keep them straight). I then attached the flowers to the mason line with wire and pipe cleaners.
Origami Flowers
I made a bunch of these flowers for a section of the store focused on dainty, feminine clothes. I attempted to fold origami flowers and got lost in the directions, so I ended up coming up with my own way of folding them. I then dipped them in fabric dyes and sprayed them with tea to mute the colors. For a final touch, I glued them to long stems and "planted" them atop a shelf.
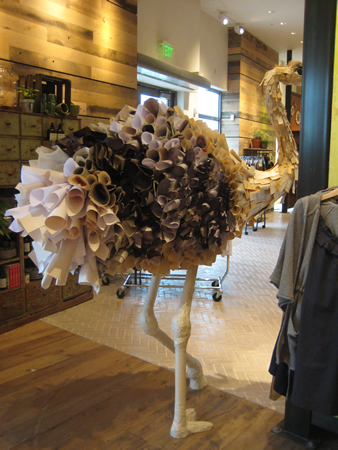
Modern Taxidermy
One of my favorite concepts during my time at Anthropologie was based on the idea of “modern taxidermy.” This area of the store was supposed to feel scientific and museum-like. It made for a lot of fun display. By far my most well received display element was this ostrich. So many different materials went into his construction, but most of what is visible on the outside is actually paper – newsprint, printer paper, and book pages.
A shot from the back. I made his legs so it would look like he was walking through the store.
Peacock
I also made a peacock. I used color selectively because I felt like a fully colored peacock would have been too distracting in the space.
The head is made from clay and the eyes are bouncy balls that I spray-painted black. My favorite part is the head fringe made from popcorn with a touch of blue paint!
I found some weathered copper leaves left over from a previous display project and used them for part of the feathers; I love how the green patina adds a bit of subtle color and picks up on the colors of the fabric and sandpaper I used for the eyes of the feathers.
Cardboard Kill
More taxidermy! I made this moose and deer head from cardboard. I’ve seen similar heads for sale, but I knew I could make them myself. I made them for Fall but kept them through Holiday and fashioned cardboard earmuffs to keep them warm.
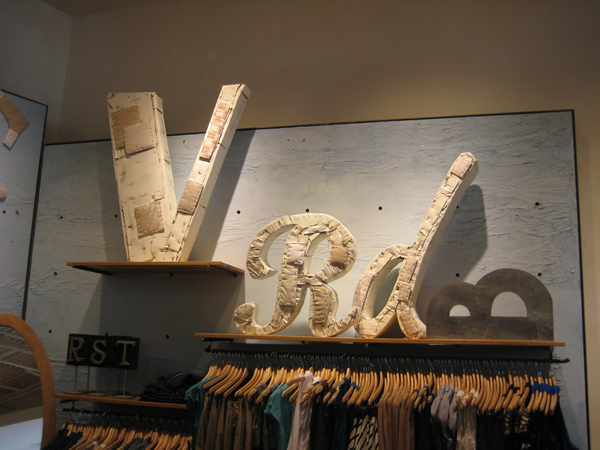
ABCs
The company requested really big letters in all different fonts and sizes for one of the apparel concepts. I was happy to oblige since it gave me the opportunity to practice and improve my jigsaw skills. The base of letters was wooden and they were wrapped in painted cardboard, which was stapled in place.
Fireplace
My most ambitious carpentry project ever was this fake fireplace. I made the entire thing by myself, from cutting every single strip of wood, to staining it all the different colors, to installing the entire thing.
Sputnik
Since the fireplace had kind of a '60s/mod/Brady Bunch feel to it, I embraced that and made a wooden sputnik sculpture to hang next to it. I had my intern cut the wood circles from birch branches. I then used a paint/water combo to wash the edges a bright green color.
Coffee Table
I sent my intern back to the chop saw to help me make this coffee table. The base of the table is actually an old piano bench I found at the thrift store. I framed out a new top and had my intern glue the wood circles in place.
Deconstructed Tree
This bedroom concept was all about a neutral palette combined with rough, natural display elements. I used firewood and branches (from my yard) to create this “deconstructed” tree on the back wall. Little tufts of cotton softened the look.
White Christmas
Holiday 2009 at Anthropologie was all about a white Christmas. To create a winter wonderland in the windows my intern and I spent *weeks* making these tissue paper poofs.
Some of the poofs had a slight glow; I strategically placed lightbulbs in certain areas so they would stand out at night.
Icy Landscape
Beside the poofs, this was the second biggest installation for Holiday 2009 -- an icy landscape on the wall. This is made from thousands of plastic cups dipped in wax and covered with fake snow. Each cup was wired and attached to a chickenwire frame.
Chandelier
The White Christmas theme continued over the cashwrap with this "chandelier" I made out of register tape. This light fixture was huge; the outside rectangle was somewhere between 8 and 10 feet long.
It doesn't show up in the photograph, but many of the strips were covered in glitter and/or dipped in wax. I love the variation in the level of light coming through the different layers.
Vortex
The best way I can think to describe this window is “cardboard sculpture” of a sort. This cardboard vortex was fashioned around a wooden conical structure I built and mounted to the wall. I completely camouflaged it with many layers of cardboard.
A shot from inside the vortex.
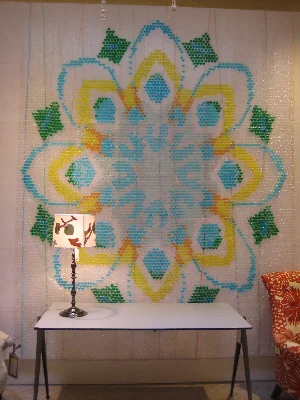
Bubble Wrap Wallflower
This is the Anthropologie project I’m most proud of since it was entirely my own creation and no other store in the country had anything like it. This big design was displayed on the main wall in a fitting room. Can you see what it’s made of…?
Bubble Wrap! I individually injected every single bubble with water dyed with food coloring.
I had to make a massive chart to keep track of what bubble needed what color. The whole project took about a week.
The colors shifted a bit with time, but overall the design and the bubbles really held up well. Everyone who visited the fitting room loved how unique it was.
Bee Windows
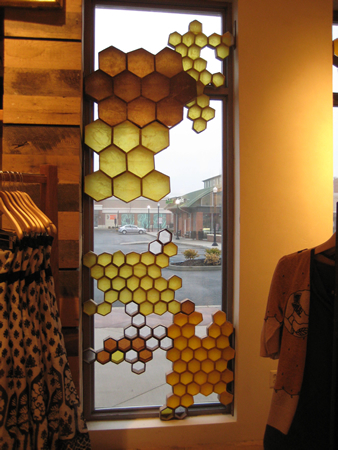
For these spring windows, Anthropologie decided they wanted to highlight the plight of bees (Colony Collapse Disorder) with bee-themed windows and some promotional items with proceeds going towards bee research. For one set of my windows I chose to make honeycomb.
This was a very labor-intensive set of windows as each honeycomb was individually made using double-walled cardboard and tissue and wax paper. I then glued them together to create clusters. As you can see, I made the honeycomb in two different sizes and a variety of colors ranging from brown to amber to yellow.
The honeycomb looked pretty on the inside of the store, too. The sunlight streaming through the window highlighted the different colors.
For my other set of windows I created an enormous hive which I hung from a tree limb.
The hive from inside the store. I created the shape of the hive with chickenwire. I then covered the entire structure with strips of shellacked tissue paper (shellacking the paper gave it an amber color and a pretty semi-translucence). For some cheeky fun, I also incorporated wrappers from Bit O’ Honey candy into the hive! Click on for a detail shot…
Here you can see the Bit O’ Honey wrappers. You might also notice a subtle glow; I dropped a lightbulb into the center of the hive. In areas where the tissue paper was thinner it added a very pretty effect, especially at night.
Live/Work
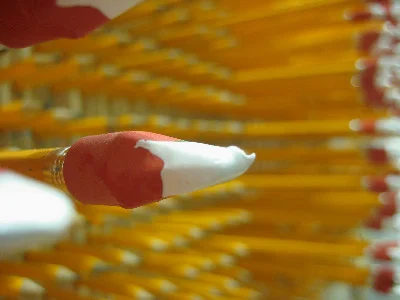
This section of the store was all about incorporating office supplies. My piece de resistance was a digital clock made from pencils! My inspiration came from pin art (i.e. those blocks of pins that you push to take the shape of your hand—everyone played with one as a kid.) So to create my “pin art” clock I used the mini golf pencils as the base, then had full length pencils pop out to create the time.
It took about a week to make the whole thing. First I had to make a grid and mark where I should drill holes for the pencils. Then, I had to drill 2100 holes (my arm was exhausted at the end). I glued the pencils into the holes and mounted it on the wall…
After I hung it the numbers weren’t “popping” as much as I wanted them to, so I bought pink eraser toppers and dipped them in white paint.
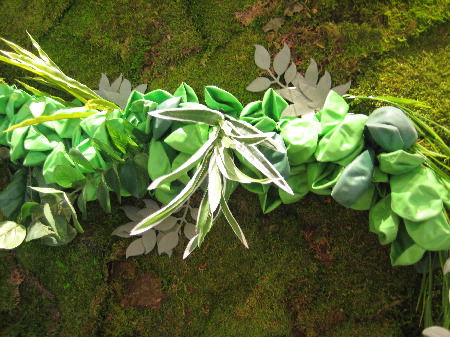
Going Green
The direction for this section of the store was all about creating a lush, green environment for home products. I covered three walls with preserved green moss. To protect the walls, I screwed big cardboard sheets to the wall then glued the moss to the cardboard.
To add visual interest and a kitschy feel, I added veins of fake plants, green balloons, and die-cut leaves to the moss walls.
Origami Installation
For the cashwrap section of my store I wanted to do something really light, feminine, and colorful. Flying origami cranes fit the bill.
I’m not sure how many origami cranes I made in the end, but it took about a week to make them all and then a couple more days to hang each by an individual string from the ceiling. The shape of the installation echoes the shape of the wings on all of the cranes. And as you look from the tips to the center, the cranes increase in size.
Detail shot of the cranes.
The smallest cranes were made from traditional origami paper. I was able to purchase nicely colored and printed paper up to 1’ X 1’, but to get the colors and prints I wanted for the larger cranes I had to paint the paper myself. The largest crane in the middle was made from a 4’ x 4’ sheet of paper that I painted and stenciled. All the other cranes in this shot were hand painted as well.
Cupcake Wreath
I saw a wreath made from doilies and Christmas lights in Martha Stewart Living and thought it would be cute to adapt the technique and create one from foil cupcake wrappers.
Bauble Trees
My first set of windows ever! I created "bauble trees" made completely from ornaments, pinecones, die cuts, cupcake wrappers, and other trinkets. To achieve the effect, I strung colorful ropes 5" apart and attached the baubles to them in the shape of trees.
A shot of the trees from inside the store. I tried to make them look as good from the inside as they did from the outside, since customers could see them from the back. These windows were my first major project at Anthro, but they remain among the highlights of my time there.